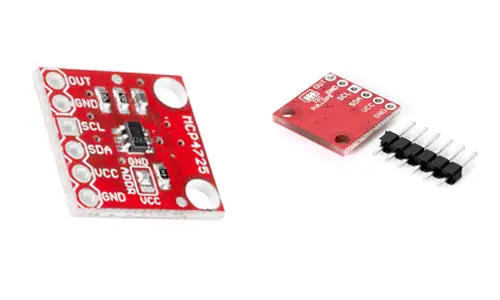
What is the MCP4725?
The MCP4725 is a 12-bit DAC, which is a device that allows obtaining an analog voltage signal from a digital processor like Arduino.
When we saw the analog outputs, we saw that, in reality, they provide a PWM signal between GND and Vcc. Even if we apply an RC filter, we will not obtain a true analog voltage signal.
Instead, an ideal DAC would generate a signal in which the output generated adopts any intermediate value between GND and Vcc, generating an authentic analog signal.
However, real DACs are not capable of adopting any voltage value, but the output is formed in N stages, so they provide a discretized analog signal with 2^N levels.
The MCP4725 is controlled via I2C, so it is easy to read. It has two possible addresses, which are chosen by connecting the ADDR pin.
It also incorporates an EEPROM memory that allows it to maintain the voltage level even after a power cut.
The supply voltage of the MCP4725 is 2.7V to 5.5V. The maximum voltage it can provide is Vcc. Powered at a voltage of 5V, its 4096 levels (12 bits) represent a precision of approximately 1mV.
The maximum current it can provide is 25mA. It is a reduced intensity but, on the other hand, similar to that of an Arduino output. The typical output change time is 6 µs.
The MCP4725 can be useful in any type of project that requires the generation of an authentic analog signal instead of a PWM, such as powering especially sensitive devices, sensor calibration, data acquisition systems, or function generators such as triangular or sine waves.
Price
DACs like the MCP4725 are inexpensive devices. We can find them for €0.70 by searching on international sellers on eBay or AliExpress.

Assembly scheme
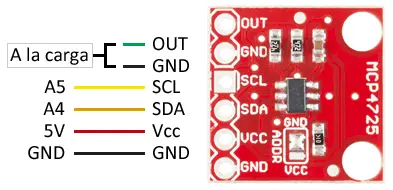
The connection is simple, we simply power the module from Arduino using GND and 5V and connect the SDA and SCL pins of Arduino with the corresponding pins of the sensor.

While the connection seen from the Arduino side would look like this.
In Arduino Uno, Nano, and Mini Pro, SDA is pin A4 and SCK is pin A5. For other Arduino models, consult the corresponding pinout diagram.
Code Examples
To read the MCP4725, we will use the library developed by Adafruit, available at [this link].(https://github.com/adafruit/Adafruit_MCP4725)
The library provides code examples, which it is advisable to review. The following example is a modification of those available in the library, which shows the use of functions generating a triangular wave with the MCP4725.
#include <Wire.h>
#include <Adafruit_MCP4725.h>

Adafruit_MCP4725 dac;

void setup(void)
{
  dac.begin(0x60);
}

void loop(void) {
    uint32_t counter;
    for (counter = 0; counter < 4095; counter++)
    {
      dac.setVoltage(counter, false);
    }
    for (counter = 4095; counter > 0; counter--)
    {
      dac.setVoltage(counter, false);
    }
}
Download the code
All the code for this post is available for download on Github.


