Historically, the Arduino Mini Pro has been one of the favorite models for expert Arduino users. Its low cost and small size made it the perfect model for projects where Arduino became a permanent part of the assembly.
However, its low cost and size had a downside: the Arduino Mini Pro lacks a USB circuit. As a result, Arduino Mini Pros have to be programmed using an external USB-TTL converter.
Currently, with the drop in price of the Arduino Nano, interest in Arduino Mini Pros has decreased significantly. The Arduino Nano does include a Micro USB port and is much simpler and faster to use (seriously, buy Arduino Nanos, you’ll save your sanity).
But in case you ever have to deal with an Arduino Mini, or if you have one stored in a drawer, or, above all, because it’s interesting for delving into the internal workings of Arduino, let’s see how to program an Arduino Mini Pro.
What is the FTDI FT232R?
To program an Arduino Mini Pro, we need a device that provides the USB circuit that most Arduino models have.
The most common programmer is the FT232R model from the company FTDI (Future Technology Devices International) with a cost of around 1.5€.
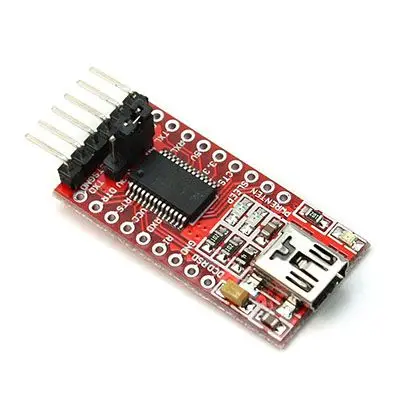
The FTDI FT232R is a device that can do more than just program Arduino Mini Pros. It’s interesting to have one in your Geek toolbox.
Installing the Drivers
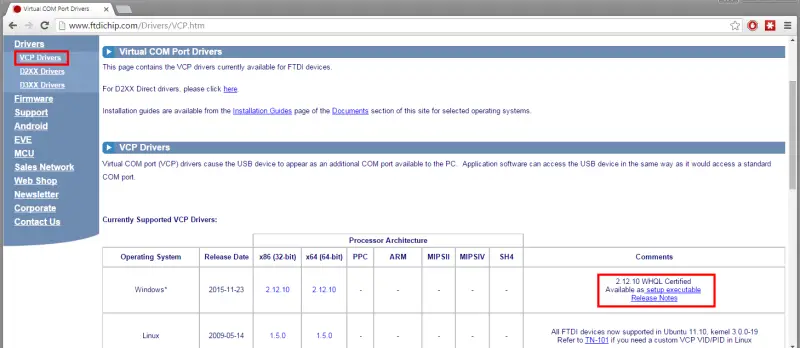
Most Linux distributions include the drivers for the FTDI FT232R. However, this is not the case in any version of Windows.
Fortunately, if you use a Windows operating system (or a Linux distribution that doesn’t include the drivers), the solution is as simple as downloading and installing the drivers from the manufacturer’s website.
Here we select VPC Drivers (Virtual COM Ports) and choose the most current driver available. In the case of Windows, make sure to download the executable installer, rather than the compressed file, as the installation is simpler.
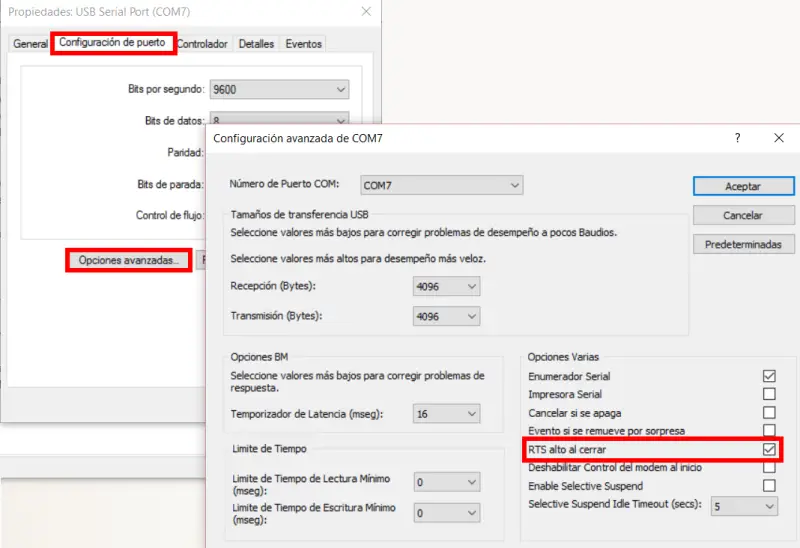
After installing the driver, connect the FTDI FT232R. Go to devices, and in COM ports locate the one corresponding to the FTDI FT232R. Right-click and choose “Properties”
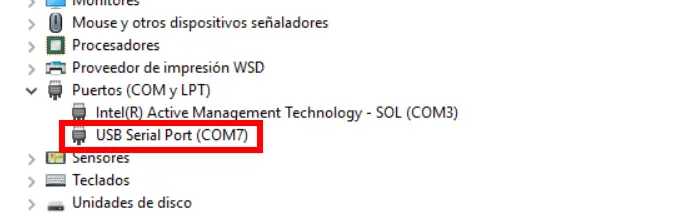
Here, in advanced options, activate the “RST high on close” option. This will reset Arduino when uploading the program, which is necessary for the Arduino programming process.
Connecting Arduino Mini Pro and FTDI FT232R
Connecting the Arduino Mini Pro to the FTDI Pro is simple. We just need to connect the 6 front connectors of the FTDI FT232R to the 6 front pins of the FTDI interface on the Arduino Mini Pro.
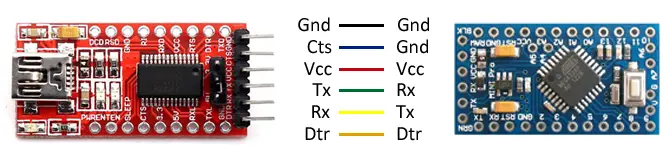
We can make the connection using normal wires with female dupont terminals or, even for quick tests, we can connect both front sides directly on a protoboard, placing them facing each other.
Next, we connect the FTDI FT232R to the computer via USB. In the Arduino IDE, we select the corresponding COM port, the Mini Pro board model, and as the programmer we leave the one we normally use “AVRISP mkII”.
Done, we can upload programs normally and use the serial port as with any other Arduino model.
Download the Code
All the code from this post is available for download on Github. 
