In this post, we are going to see how to implement a Petri Net on a processor like Arduino. Petri Nets are a powerful mechanism in event theory and, especially, in systems with concurrent events.
In a previous post, we saw finite state machines as a structured way to approach programming an automaton. In a way, we can consider Petri Nets as an evolution of state machines.
In a state machine, only one state can be active at any given moment. State changes occur through transitions, which depend solely on the current state and a condition associated with the transition.
In contrast, in a Petri Net, instead of states, we have nodes. Each node can have a null or non-null number of tokens. In the graphical representation of a Petri Net, tokens are usually represented as dots inside the nodes.
Here are some graphical representations of simple Petri Nets.
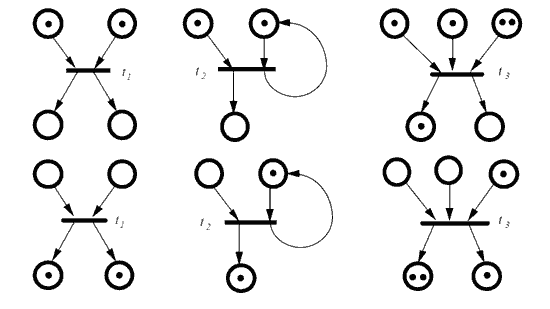
Another difference compared to a finite state machine is that transitions in a Petri Net can be associated with more than one input node and have more than one output node.
For a transition to be able to fire, in addition to meeting its associated condition, it must have at least one token in each of its input nodes. In this case, we say the transition is enabled, meaning it can fire if its associated condition is met.
When a transition fires, it removes one token from each input node and adds one token to each output node.
Petri Nets allow for a more convenient representation of certain automata, especially those that require concurrent events or branch synchronization. Imagine, for example, an industrial machine that, to perform an operation, needs a part to be present at two workstations (e.g., I cannot assemble a juice bottle until I have the bottle, the cap, and the label).
Petri Net Example
The classic example to illustrate the operation and utility of a Petri Net is the case of two synchronized carts. We have two rails, each with a cart moving on it. Pressing a button moves the cart on the upper rail to the other side. Another button does the same for the cart on the lower rail.
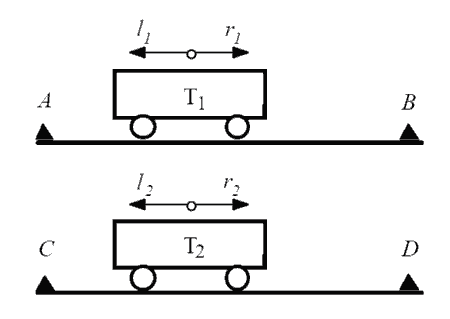
However, for both carts to move, they need to be synchronized. That is, both carts must have changed sides before either one can move back. It is not possible, for example, for the upper cart to change stations several times while the lower one is stationary.
This problem has a simple representation as a Petri Net, whereas, if implemented as a state machine, the solution is comparatively more complex.
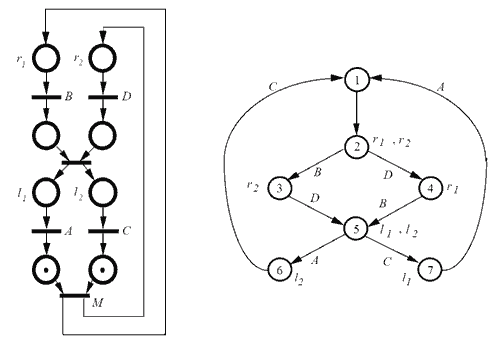
The advantage of the Petri Net becomes clear if, instead of two carts, we use three. The Petri Net remains simple, while we see that the complexity needed for the equivalent state machine skyrockets.
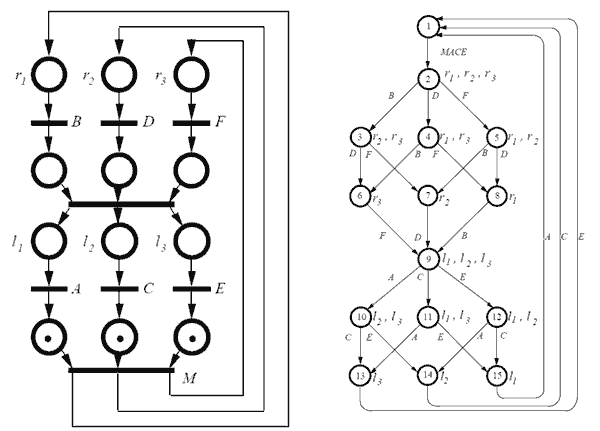
This illustrates the convenience and utility of Petri Nets compared to finite state machines, especially in handling automata with parallel branches and the need for event synchronization.
Implementing a Petri Net on Arduino
After this brief introduction to Petri Nets, let’s see how it’s not as difficult as it seems to implement a simple one on Arduino.
We’ll see it with a simple example, a variation of the synchronized carts example mentioned earlier. Although perhaps it’s easier to visualize if you imagine, for example, parts on an assembly line.
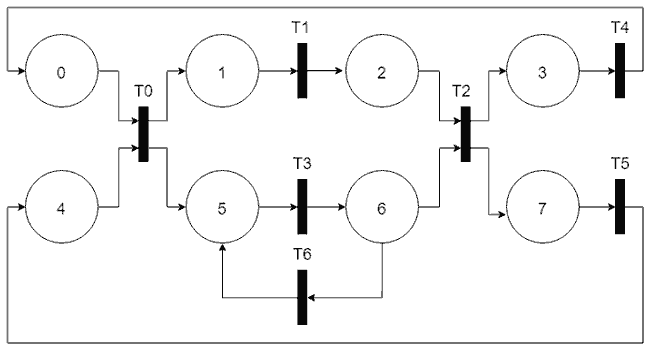
In the example, we have two branches, upper and lower, and four stations, so we have a total of eight states. The upper branch advances when it receives the character ‘A’ via serial port, and the lower one when it receives ‘B’.
To make it more interesting, the transition from the first station and to the last station accepts both ‘A’ and ‘B’. With either of these inputs, the tokens will advance simultaneously in both branches.
And to include a timer, let’s assume that in the lower station, the cart returns from state 6 to 5, if the part on the upper rail has not advanced after a period of 5 seconds.
Let’s look at a very lightweight and simple implementation of this Petri Net.
enum Input
{
  ForwardA = 0,
  ForwardB = 1,
  Unknown = 2
};

Input input;

const int numStates = 8;

uint8_t _markup[numStates];
uint8_t _prevMarkup[numStates];

// Definition of the transitions
void Transition0()
{
  if (_prevMarkup[0] && _prevMarkup[4] && (input == Input::ForwardA || input == Input::ForwardB))
  {
    RemoveMark(0); RemoveMark(4);
    AddMark(1); AddMark(5);
    Serial.println("Fired T0");
    printMarkup();
  }
}

void Transition1()
{
  if (_prevMarkup[1] && input == Input::ForwardA)
  {
    RemoveMark(1);
    AddMark(2);
    Serial.println("Fired T1");
    printMarkup();
  }
}

void Transition2()
{
  if (_prevMarkup[2] && _prevMarkup[6] && (input == Input::ForwardA || input == Input::ForwardB))
  {
    RemoveMark(2); RemoveMark(6);
    AddMark(3); AddMark(7);
    Serial.println("Fired T2");
    printMarkup();
  }
}

void Transition3()
{
  if (_prevMarkup[3] && input == Input::ForwardA)
  {
    RemoveMark(3);
    AddMark(0);
    Serial.println("Fired T3");
    printMarkup();
  }
}

void Transition4()
{
  if (_prevMarkup[5] && input == Input::ForwardB)
  {
    RemoveMark(5);
    AddMark(6);
    activateTimer();
    Serial.println("Fired T4");
    printMarkup();
  }
}

void Transition5()
{
  if (_prevMarkup[7] && input == Input::ForwardB)
  {
    RemoveMark(7);
    AddMark(4);
    Serial.println("Fired T5");
    printMarkup();
  }
}

void Transition6()
{
  if (_prevMarkup[6] && timerExpired())
  {
    RemoveMark(6);
    AddMark(5);
    Serial.println("Fired T6");
    printMarkup();
  }
}

void setup()
{
  Serial.begin(9600);

  // Initial state
  for (uint8_t index = 0; index < numStates; index++)
    _markup[index] = 0;

  _markup[0] = 1;
  _markup[4] = 1;

  printMarkup();  // Show the initial state
}

void loop()
{
  input = static_cast<Input>(readInput());

  Update();
}

// Update the net
void Update()
{
  // Copy markup to prevMarkup
  memcpy(_prevMarkup, _markup, numStates * sizeof(uint8_t));

  Transition0();
  Transition1();
  Transition2();
  Transition3();
  Transition4();
  Transition5();
  Transition6();
}

void AddMark(uint8_t index)
{
  _markup[index]++;
}

void RemoveMark(uint8_t index)
{
  _prevMarkup[index]--;
  _markup[index]--;
}

// Read a character for the example
int readInput()
{
  Input currentInput = Input::Unknown;
  if (Serial.available())
  {
    char incomingChar = Serial.read();

    switch (incomingChar)
    {
    case 'A': currentInput = Input::ForwardA; break;
    case 'B': currentInput = Input::ForwardB; break;
    default: break;
    }
  }

  return currentInput;
}

// For example debugging
void printMarkup()
{
  Serial.print(_markup[0]);
  Serial.print(_markup[1]);
  Serial.print(_markup[2]);
  Serial.println(_markup[3]);

  Serial.print(_markup[4]);
  Serial.print(_markup[5]);
  Serial.print(_markup[6]);
  Serial.println(_markup[7]);
}

// Timer for transition 6
unsigned long previousMillis;
bool isTimerON = false;

void activateTimer()
{
  isTimerON = true;
  previousMillis = millis();
}

bool timerExpired()
{
  if (isTimerON == false) return false;

  if ((unsigned long)(millis() - previousMillis) >= 5000)
    return true;
  return false;
}In this simple implementation, on one hand, we have two vectors that store the current and previous marking state (we’ll see later why we need the previous one).
Most of the program’s weight is in the Transition0…5() functions, which contain all the transition logic. They check if the transition is enabled and if the firing condition is met. If the condition is met and it is enabled, it performs the appropriate actions and updates the Petri Net’s marking.
In the Setup function, we simply initialize the token state to the initial position. In the loop, we receive a character via serial port and update the Petri Net state with the Update function. The Update function copies the machine state to the previous state vector and fires all transitions. The reason for copying the machine state is to avoid transitions that were not enabled becoming enabled during the marking changes of one iteration.
For the same reason, tokens are added using the AddMark and RemoveMark functions. Both changes are made to the new marking. But in the previous marking, which is used to determine if an input is enabled, we only remove them, not add them.
For the timed input, when transition 4 fires, we activate a timer. Transition 6 has as its firing condition the value of the timerExpired function, which precisely returns true when the timer has expired.
Finally, we have additional functions for the example to work, such as readInput, which receives the input via serial port, and printMarkup, which shows the net’s state so we can verify the example’s operation.
This implementation is very simple, but it is suitable to illustrate that implementing a Petri Net doesn’t have to be as complex as it seems. We could improve it a lot using vectors, structures, … but it doesn’t make much sense because that’s exactly what we are going to see in the next section.
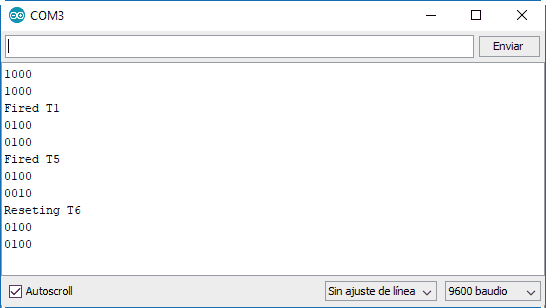
Results
If we run the previous code, we can see the result via serial port. We can change the state by pressing the ‘A’ and ‘B’ keys.
Petri Net in a Library
We have seen a very simple implementation of a Petri Net on Arduino, among the many possible ways to do it. But it should have been clear that it has large repetitive parts.
In this case, the code is begging us to use objects, which in Arduino translates to making a library.
So here is the PetriNet library, which implements a Petri Net on Arduino in a comfortable and simple way, with additional optimizations. You are invited to take a look at the code.
With this library, the previous example would be solved with the following code.
#include "PetriNetLib.h"

enum Input
{
  ForwardA = 0,
  ForwardB = 1,
  Unknown = 2
};

Input input;

PetriNet petriNet(8, 7);

void setup()
{
  Serial.begin(9600);

  // Definition of the example's Petri net
  // Inputs and outputs of the states
  static uint8_t inputs0[] = { 0, 4 };
  static uint8_t outputs0[] = { 1, 5 };

  static uint8_t inputs1[] = { 1 };
  static uint8_t outputs1[] = { 2 };

  static uint8_t inputs2[] = { 2, 6 };
  static uint8_t outputs2[] = { 3, 7 };

  static uint8_t inputs3[] = { 3 };
  static uint8_t outputs3[] = { 0 };

  static uint8_t inputs4[] = { 5 };
  static uint8_t outputs4[] = { 6 };

  static uint8_t inputs5[] = { 7 };
  static uint8_t outputs5[] = { 4 };

  // Transitions
  petriNet.SetTransition(0, inputs0, 2, outputs0, 2,
    []() -> bool {return input == Input::ForwardA || input == Input::ForwardB; },
    []() {Serial.println("Fired T0"); printMarkup(); });

  petriNet.SetTransition(1, inputs1, 1, outputs1, 1,
    []() -> bool {return input == Input::ForwardA; },
    []() {Serial.println("Fired T1"); printMarkup(); });

  petriNet.SetTransition(2, inputs2, 2, outputs2, 2,
    []() -> bool {return input == Input::ForwardA || input == Input::ForwardB; },
    []() {Serial.println("Fired T2"); printMarkup(); });

  petriNet.SetTransition(3, inputs3, 1, outputs3, 1,
    []() -> bool {return input == Input::ForwardA; },
    []() {Serial.println("Fired T3"); printMarkup(); });

  petriNet.SetTransition(4, inputs4, 1, outputs4, 1,
    []() -> bool {return input == Input::ForwardB; },
    []() {Serial.println("Fired T4"); printMarkup(); activateTimer(); });

  petriNet.SetTransition(5, inputs5, 1, outputs5, 1,
    []() -> bool {return input == Input::ForwardB; },
    []() {Serial.println("Fired T5");  printMarkup(); });

  petriNet.SetTransition(6, outputs4, 1, inputs4, 1,
    timerExpired,
    []() {Serial.println("Reseting T6"); printMarkup(); });

  // Initial marking
  petriNet.SetMarkup(0, 1);
  petriNet.SetMarkup(4, 1);

  printMarkup();  // Show the initial state
}

void loop()
{
  input = static_cast<Input>(readInput());

  petriNet.Update();
}

// Read a character for the example
int readInput()
{
  Input currentInput = Input::Unknown;
  if (Serial.available())
  {
    char incomingChar = Serial.read();

    switch (incomingChar)
    {
    case 'A': currentInput = Input::ForwardA; break;
    case 'B': currentInput = Input::ForwardB; break;
    default: break;
    }
  }

  return currentInput;
}

// For example debugging
void printMarkup()
{
  Serial.print(petriNet.GetMarkup(0));
  Serial.print(petriNet.GetMarkup(1));
  Serial.print(petriNet.GetMarkup(2));
  Serial.println(petriNet.GetMarkup(3));

  Serial.print(petriNet.GetMarkup(4));
  Serial.print(petriNet.GetMarkup(5));
  Serial.print(petriNet.GetMarkup(6));
  Serial.println(petriNet.GetMarkup(7));
}

// Timer for transition 6
unsigned long previousMillis;
bool isTimerON = false;

void activateTimer()
{
  isTimerON = true;
  previousMillis = millis();
}

bool timerExpired()
{
  if (isTimerON == false) return false;

  if ((unsigned long)(millis() - previousMillis) >= 5000)
    return true;
  return false;
}Download the Code
All the code from this post is available for download on Github.

