Let’s look at a series of tutorials aimed at seeing how to create a hybrid desktop application that combines WPF, Webview2, ASP.NET and a Web application as UI (that’s something!).
For many years we’ve heard that the future of development is Web, and Desktop is doomed to disappear. In many ways, it is, I’m not going to be the one to deny it.
But, although often ignored, there is still a need for desktop applications. Because yes, even if we ignore that elephant in the room, not everything can be web yet.
While we wait for the Desktop world to finally collapse, or reinvent itself, a good handful of technologies have emerged to fill the gap. Electron, Tauri, Flutter, Blazor hybrid, Reactive Native, … everyone has their solution (another thing is whether any of them actually work well or have a future).
As if there weren’t enough options already, today we are going to see one of these solutions for generating Desktop applications using C# technologies for the backend, and Web for the UI.
In this first tutorial we will see how to configure the backend part (ASP.NET, and WPF) and in the next tutorials we will see how to connect it with a Web Frontend (with React, Vue or Astro).
Technological stack of the solution
The solution we propose is a hybrid application that combines the best of three worlds (desktop, backend and web). Basically we have,
- .NET WPF or MAUI for the desktop interface. I will do the example with WPF (Windows). But it would be basically the same in MAUI (Android, Mac).
- Webview2 for UI rendering (based on Chromium)
- ASP.NET Core as backend (with local embedded or stand-alone option)
- Web Frontend for the UI. Where we can use any Web framework or technology (like React, Vue, Astro, etc).
Why choose this combination over so many others? Mainly because it uses native .NET technologies (WPF/MAUI, Asp.NET) along with Webview2 as a native control.
That is, proven, maintained, well-known technologies with high performance. No dependencies, no libraries. And the development experience is very comfortable.
Well, it can’t be such a bad tech stack, since it’s very similar to the one Microsoft itself is using in its applications.
And since there isn’t a tutorial that explains how to set up this whole thing, let’s see it step by step 👇
Prerequisites
Before starting, I assume you have what’s necessary.
- Visual Studio 2022 (or higher) with .NET and desktop development workloads.
- Node.js and NPM to handle Web dependencies.
- WebView2 Runtime installed on your system.
- Basic knowledge of C#, WPF, ASP.NET, and web development.
If you are missing any of them, take a walk through the website, we have them all explained 😉.
Project structure
Our hybrid application will have the following structure:
- AppWPF: A WPF project that will integrate the web application using WebView2.
- ServerAspnet: An ASP.NET Core project that will act as an embedded API server.
- ClientWeb: A Web application that will run in the browser or inside WebView2.
And here is a file structure, so we don’t get lost.
HybridApp/ │ ├── AppWPF/ # WPF Project (Desktop Frontend) │ ├── MainWindow.xaml # WPF user interface │ └── MainWindow.xaml.cs # Main window logic │ ├── ServerAspnet/ # ASP.NET Core Project (Backend) │ ├── Controllers/ # ASP.NET Core Controllers │ ├── appsettings.json # Application configuration │ └── ServerAspnet.csproj # ASP.NET Core project file │ └── ClientWeb/ # Web Frontend ├── public/ # Static files (HTML, images, etc.) ├── src/ # Frontend source code
└── package.json # Node.js dependencies
I’ve only listed the main files to understand the relationships. There will obviously be many more files.
Create ASP.NET project
Let’s start by creating the ASP.NET project, which is the easiest part. To do this, we create a folder for our project, for example, MiAppHibrida
Inside this folder we execute,
dotnet new webapi -n ServerAspnet
When it has created the project, we open the Program.cs file and change it to this example code I’m giving you.
using System.Net;
using System.Net.NetworkInformation;
using Microsoft.AspNetCore.Mvc.ApplicationParts;

namespace ServerAspnet
{
    public class Program
    {
        public static int port = 0;

        public static void Main(string[] args)
        {
            var builder = WebApplication.CreateBuilder(args);

            builder.Services.AddCors(options =>
            {
                options.AddPolicy(
                    "AllowAll",
                    policy =>
                    {
                        policy
                            .WithOrigins("http://localhost:5173") // Your frontend URL in Dev mode
                            .AllowAnyMethod()
                            .AllowAnyHeader()
                            .AllowCredentials(); // Allow sending credentials (cookies, authentication headers)
                    }
                );
            });

            builder.Services.AddSignalR();
            builder
                .Services.AddControllers()
                .PartManager.ApplicationParts.Add(new AssemblyPart(typeof(Program).Assembly));

#if DEBUG
            builder.Services.AddEndpointsApiExplorer();
            builder.Services.AddSwaggerGen();
#endif

            var app = builder.Build();

#if DEBUG
            if (app.Environment.IsDevelopment())
            {
                app.UseSwagger();
                app.UseSwaggerUI();
            }
#endif

#if !DEBUG
            // dynamic port (we'll see this in the next section)
            port = GetAvailablePort(5000);
            builder.WebHost.UseUrls($"http://localhost:{port}");
#endif

            app.UseCors("AllowAll");

            app.UseHttpsRedirection();
            app.UseAuthorization();

            app.MapControllers();

            app.UseDefaultFiles(); // <-- Serves index.html by default
            app.UseStaticFiles(); // <-- Serves files from wwwroot

            app.MapGet("/api/demo", () => new { message = "It works! 🎉" });
            app.MapHub<ClockHub>("/clockHub");

            if (args.Any(x => x == "run_async"))
                app.RunAsync();
            else
                app.Run();
        }
    }
}
Basically what we’ve done is an ASP.NET API, which we will run embedded in our WPF App, or standalone.
Of course you can adjust your configuration, this is an example to see how to run it in hybrid mode.
Vary port
When we run a web application on a server (or in a container) we have control over the ports it uses. But when making a desktop app, we have no control over whether the port we want to use is available.
For example, even launching two instances of your program would give an error, because both would use the same port.
One way to solve this is to make the program find a free port. That’s why we added these two lines.
#if !DEBUG
	port = GetAvailablePort(5000);
	builder.WebHost.UseUrls($"http://localhost:{port}");
#endif
Which use this GetAvailablePort function which does, well that… find an Available Port 😉.
public static int GetAvailablePort(int startingPort)
{
	IPEndPoint[] endPoints;
	List<int> portArray = new List<int>();

	IPGlobalProperties properties = IPGlobalProperties.GetIPGlobalProperties();

	//getting active connections
	TcpConnectionInformation[] connections = properties.GetActiveTcpConnections();
	portArray.AddRange(
		from n in connections
		where n.LocalEndPoint.Port >= startingPort
		select n.LocalEndPoint.Port
	);

	//getting active tcp listeners - WCF service listening in tcp
	endPoints = properties.GetActiveTcpListeners();
	portArray.AddRange(from n in endPoints where n.Port >= startingPort select n.Port);

	//getting active udp listeners
	endPoints = properties.GetActiveUdpListeners();
	portArray.AddRange(from n in endPoints where n.Port >= startingPort select n.Port);

	portArray.Sort();

	for (int i = startingPort; i < UInt16.MaxValue; i++)
		if (!portArray.Contains(i))
			return i;

	return 0;
}
Integrate controllers
In general, the preferred way to add logic to an ASP.NET app is through Controllers, which manage the endpoints.
For the example, in addition to the traditional WeatherForecastController (which is always used as an example) I added this one
using Microsoft.AspNetCore.Mvc;

namespace ServerAspnet.Controllers;

[ApiController]
[Route("[controller]")]
public class FilesController : ControllerBase
{
    private readonly ILogger<FilesController> _logger;

    public FilesController(ILogger<FilesController> logger)
    {
        _logger = logger;
    }

    [HttpGet(Name = "GetFiles")]
    public IEnumerable<string> Get()
    {
        var path = "C:\\temp";
        return System.IO.Directory.GetFiles(path);
    }
}
Which simply shows the files you have in the C:\temp folder to demonstrate how the Desktop App will have the same access capabilities as a “normal” App.
If you don’t have the C:\temp folder, it will give you an error. If you want to run the example as I’m giving it to you, create this folder, or modify the path to one that exists.
On the other hand, in a “normal” ASP.NET application, it would automatically recognize the controllers during compilation.
In our case it will also work. But, since we can launch the backend from another assembly (when embedding it in the Desktop app), we have to specify the assembly name
builder
	.Services.AddControllers()
	.PartManager.ApplicationParts.Add(new AssemblyPart(typeof(Program).Assembly));  // this is the added part
This does not interfere with the App when running in Web mode, it’s just a way to also make it work in Desktop mode
Integrate SignalR
SignalR is a real-time solution from Microsoft, which is very practical for bidirectional communication between server and client. We can also add it to our solution.
For that we install the SignalR package.
dotnet add package Microsoft.AspNetCore.SignalR
For the example I created a very simple Hub, which simply sends the current time to the UI client.
using Microsoft.AspNetCore.SignalR;

namespace ServerAspnet
{
    public class ClockHub : Hub
    {
        // This method is called when a client connects
        public override async Task OnConnectedAsync()
        {
            // Start sending the time every second
            await SendTime();
        }

        // Method that sends the time every second
        private async Task SendTime()
        {
            while (true)
            {
                // Send the time to all connected clients
                await Clients.All.SendAsync("ReceiveTime", DateTime.Now.ToString("HH:mm:ss"));
                await Task.Delay(1000); // Wait 1 second before sending the time again
            }
        }
    }
}
These lines in program.cs are the ones that activate SignalR in the solution, and register the demo Hub I created.
builder.Services.AddSignalR();

///....

app.MapHub<ClockHub>("/clockHub");
Create WPF project
Now it’s time to create the skeleton of our desktop application, creating the WPF application. To do this we open a terminal and execute
dotnet new wpf -n HybridAppWPF cd HybridAppWPF
Next, we have to install the necessary packages and dependencies. To do this we do the following,
dotnet add package Microsoft.AspNetCore.App dotnet add package Microsoft.Web.WebView2
If you do it this way it will work, but it will give you a NETSDK1080 warning that
PackageReference to Microsoft.AspNetCore.App is not necessary when targeting .NET Core 3.0 or later. If using Microsoft.NET.Sdk.Web, the shared framework will be referenced automatically. Otherwise, PackageReference should be replaced with FrameworkReference.
AspNETCore.App doesn’t like us adding it this way. This is because it’s a Package designed for use in Microsoft.NET.Sdk.Web projects and we are using a WPF project, and therefore it’s Microsoft.NET.Sdk
We can fix it better if we do it like this in the project file
Add the Webview2
For our WPF application to display our Web App we must modify the following files
<Window x:Class="HybridAppWPF.MainWindow"
	   xmlns="http://schemas.microsoft.com/winfx/2006/xaml/presentation"
	   xmlns:x="http://schemas.microsoft.com/winfx/2006/xaml"
	   xmlns:d="http://schemas.microsoft.com/expression/blend/2008"
	   xmlns:mc="http://schemas.openxmlformats.org/markup-compatibility/2006"
	   xmlns:wv2="clr-namespace:Microsoft.Web.WebView2.Wpf;assembly=Microsoft.Web.WebView2.Wpf"
	   mc:Ignorable="d"
	   Title="Hybrid App" Height="600" Width="800">
   <Grid>
	   <wv2:WebView2 Name="webView" />
   </Grid>
</Window>
using System.Windows;

namespace AppWPF;

/// <summary>
/// Interaction logic for MainWindow.xaml
/// </summary>
public partial class MainWindow : Window
{
    private readonly WebServer _server = new WebServer();

    public MainWindow()
    {
        InitializeComponent();
        Loaded += MainWindow_Loaded;
    }

    private async void MainWindow_Loaded(object sender, RoutedEventArgs e)
    {
        Console.WriteLine("Starting web server...");
        var port = _server.Start();
        await webView.EnsureCoreWebView2Async();

#if DEBUG
        webView.CoreWebView2.Navigate("http://localhost:5173");
#else
        webView.CoreWebView2.Navigate($"http://localhost:{port}");
#endif
    }
}
That is,
- We have added the Webview2 control in the XAML
- We have configured the logic so that, in DEBUG mode, it shows the Web page (which we will launch in parallel with NPM for development.
- In RELEASE mode we will host and serve the final web from the WPF.
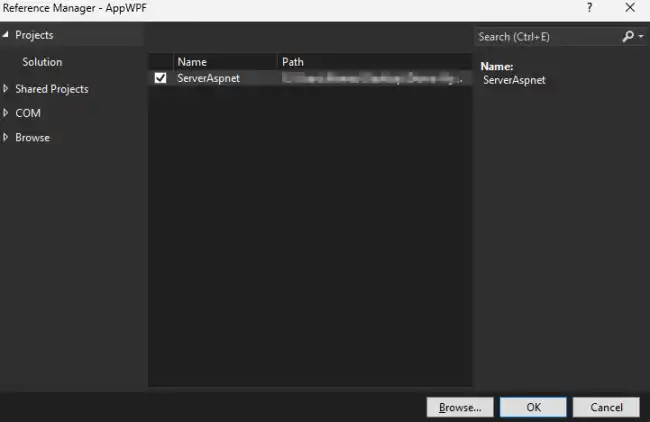
Embed the ASP.NET project
Now, to create the AP.NET Core server inside WPF, first we add the project we created earlier as a dependency.
On the other hand, we are going to add a file called WebServer.cs that acts as an intermediary between WPF and ASP.NET.
using Microsoft.AspNetCore.Builder;
using Microsoft.AspNetCore.Hosting;
using Microsoft.Extensions.DependencyInjection;
using System.Windows;

namespace AppWPF
{
    public class WebServer
    {
        private WebApplication? _app;

        public int Start()
        {
            try
            {
                Console.WriteLine("Starting web server...");
                ServerAspnet.Program.Main(new string[] { "run_async" });

                var port = ServerAspnet.Program.port;
                Console.WriteLine($"Started on {port}");
                return port;
            }
            catch (Exception ex)
            {
                MessageBox.Show($"Error in the server: {ex.Message}");
                return 0;
            }
        }

        public void Stop() => _app?.StopAsync();
    }
}
What we are doing is creating an adapter in the WPF project, that launches and shuts down (if you want) the ASP.NET project. When launched, it will be “embedded” within the WPF.
Again, you can add more logic here. This is the minimal example to get it working.
Run the application in development
When we are developing with our application, we simply have to run the WPF app in Debug mode.
We will see an error saying there is no web (don’t worry, that’s what we wanted in Debug).

Now, on the other hand, we go to another terminal, open the Web project, and execute
cd ClientWeb npm run dev
Press F5 in our WPF App and ta-da!… We see our application working “It works! 🎉” coming from the ASP.NET server

Now we can develop our ASP