In this tutorial, we will see how to use the SPI protocol with a Raspberry Pi to communicate with external high-speed devices.
SPI (Serial Peripheral Interface) is a synchronous serial communication protocol widely used for communication between a microcontroller and peripheral devices, such as sensors, displays, or flash memories.
SPI is known for its high speed and simplicity, making it a popular choice in hardware projects (on the downside, it requires more wires than I2C, for example).
If you want to learn more about the SPI bus, check out:
What is SPI?
SPI is a full-duplex communication protocol, meaning data can be sent and received simultaneously. It uses four main lines for communication:
- SCLK (Serial Clock): Clock signal generated by the master to synchronize communication.
- MOSI (Master Out Slave In): Data line from the main to the follower.
- MISO (Master In Slave Out): Data line from the follower to the main.
- SS/CS (Slave Select/Chip Select): Line used to select the follower device you want to communicate with.
Each follower device has its own select line, allowing the master to communicate with only one follower at a time.
Connecting SPI Devices
The Raspberry Pi has two available SPI ports: SPI0 and SPI1. The SPI0 port is the most commonly used and is available on the following GPIO pins:
- GPIO 8 (CE0): Chip Select 0
- GPIO 7 (CE1): Chip Select 1
- GPIO 11 (MOSI): Master Out Slave In
- GPIO 9 (MISO): Master In Slave Out
- GPIO 10 (SCLK): Serial Clock
If you have multiple follower devices connected to the SPI bus, you must use the select lines (CS) to choose the device you want to communicate with.
Configuring SPI on Raspberry Pi
The Raspberry Pi has native support for SPI through its GPIO (General Purpose Input/Output). To use SPI, we first need to enable it in the system configuration.
Open the terminal on your Raspberry Pi.
Run the following command to open the Raspberry Pi configuration:
sudo raspi-config
Go to Interfacing Options > SPI and select Yes to enable I2C. 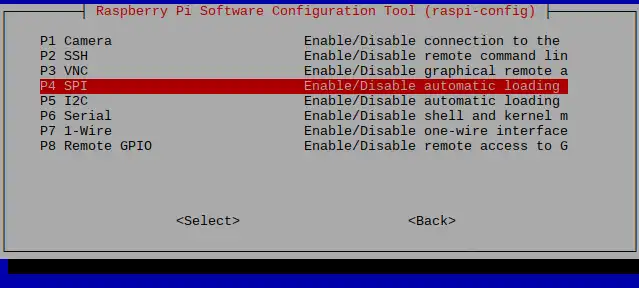
Reboot the Raspberry Pi to apply the changes:
sudo reboot
After rebooting, you can verify if SPI is enabled by running the following command in the terminal:
lsmod | grep spi
If SPI is enabled, you should see something like spi_bcm2835 in the output.
Programming SPI in Python
To interact with SPI devices on Raspberry Pi, we can use the spidev library, which provides a simple interface for working with SPI in Python.
First, install the spidev library by running the following command in the terminal:
sudo apt-get install python3-spidev
Let’s go with a simple example of how to send and receive data via SPI using Python:
import spidev

# Create an instance of SPI
spi = spidev.SpiDev()

# Open the SPI bus (bus 0, device 0)
spi.open(0, 0)

# Set the clock speed (in Hz)
spi.max_speed_hz = 1000000  # 1 MHz

# Send data to the SPI device
data_sent = [0x01, 0x02, 0x03]  # Data to send
data_received = spi.xfer(data_sent)  # Send and receive data

# Print the received data
print("Received data:", data_received)

# Close the SPI connection
spi.close()
In this example,
- We open the SPI0 bus and set the clock speed to 1 MHz.
- Then, we send a list of bytes (
[0x01, 0x02, 0x03]) to the SPI device and receive the response.
Practical Examples
Communication with an SPI Sensor
Suppose we have an SPI sensor that measures temperature and returns a 2-byte value. Here’s how we could read the temperature using SPI:
import spidev

# Create an instance of SPI
spi = spidev.SpiDev()

# Open the SPI bus (bus 0, device 0)
spi.open(0, 0)

# Set the clock speed (in Hz)
spi.max_speed_hz = 1000000  # 1 MHz

# Send command to read temperature
command = [0x01]  # Command to read temperature
response = spi.xfer(command)  # Send command and receive response

# Convert the response to temperature
temperature = (response[0] << 8) | response[1]  # Combine the 2 bytes
temperature = temperature / 10.0  # Convert to degrees Celsius

# Print the temperature
print(f"Temperature: {temperature} °C")

# Close the SPI connection
spi.close()
In this example,
- We send a command to the sensor to read the temperature and receive a 2-byte response.
- Then, we combine the bytes and convert the value to degrees Celsius.
