In this article, we are going to see how to use the I2C bus with a Raspberry Pi to communicate with external devices.
The I2C (Inter-Integrated Circuit) protocol is a widely used communication standard in electronics for connecting low to medium speed devices (like sensors, displays, and memories).
I2C is especially useful in IoT, robotics, and automation projects, where simple communication with multiple devices is required, with the advantage of needing only two wires.
What is I2C?
I2C is a synchronous serial communication protocol that allows data transfer between devices using only two lines:
- SDA (Serial Data Line): Bidirectional data line.
- SCL (Serial Clock Line): Clock line that synchronizes communication.
Furthermore, I2C uses a unique addressing system for each device connected to the bus, allowing multiple devices to share the same bus without interference.
Each device has a unique 7-bit or 10-bit address, allowing up to 128 (7-bit) or 1024 (10-bit) devices to be connected on the same bus.
I2C supports different speeds, such as 100 kbps (standard mode), 400 kbps (fast mode), and up to 3.4 Mbps (high-speed mode).
Connecting I2C Devices
The Raspberry Pi has two dedicated pins for I2C:
- GPIO 2 (SDA): Data pin
- GPIO 3 (SCL): Clock pin
Connect the I2C devices to these pins, making sure all devices share a common ground (GND) connection.
On the other hand, the I2C protocol requires pull-up resistors on the SDA and SCL lines to ensure correct operation.
The Raspberry Pi includes internal pull-up resistors, but in some cases, especially with long cables or many devices, you may need to add external resistors (typically 4.7 kΩ).
Configuring I2C on Raspberry Pi
To use I2C on a Raspberry Pi, we must first enable the protocol and configure the corresponding pins. Let’s see how to do it step by step.
Open the terminal on your Raspberry Pi.
Run the following command to open the Raspberry Pi configuration:
sudo raspi-config
Go to Interfacing Options > I2C and select Yes to enable I2C. 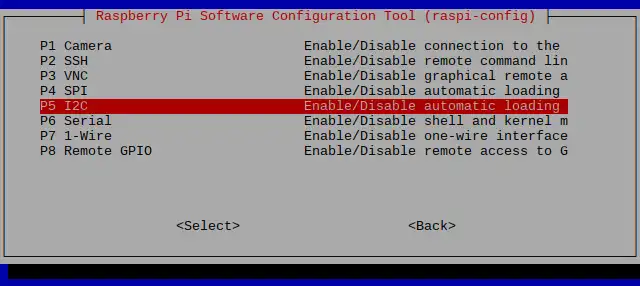
Reboot the Raspberry Pi to apply the changes:
sudo reboot
Installing I2C Tools
To interact with I2C devices, it is also very convenient to install the i2c-tools:
sudo apt update sudo apt install i2c-tools
These tools allow us to scan devices connected to the I2C bus and verify their operation.
For example, before communicating with a device, it is useful to scan the I2C bus to detect the addresses of connected devices. Use the following command in the terminal:
i2cdetect -y 1
This command will display a table with the addresses of the detected devices. Something like this,
     0  1  2  3  4  5  6  7  8  9  a  b  c  d  e  f
00:          -- -- -- -- -- -- -- -- -- -- -- -- --
10: -- -- -- -- -- -- -- -- -- -- -- -- -- -- -- --
20: -- -- -- -- -- -- -- -- -- -- -- -- -- -- -- --
30: -- -- -- -- -- -- -- -- -- -- -- -- -- -- -- --
40: -- -- -- -- -- -- -- -- 48 -- -- -- -- -- -- --
50: -- -- -- -- -- -- -- -- -- -- -- -- -- -- -- --
60: -- -- -- -- -- -- -- -- -- -- -- -- -- -- -- --
70: -- -- -- -- -- -- -- --
In this example, a device with the address 0x48 has been detected.
Communicating with I2C Devices
Once the I2C bus is configured, we can start communicating with the connected devices. There are several libraries that can help us use I2C from our programs.
For example, the smbus2 library is a Python implementation for interacting with I2C devices. Install it by running:
pip install smbus2
Let’s look at a basic example of how we can use it to read and write data to an I2C device using Python.
from smbus2 import SMBus

# I2C device address
DEVICE_ADDRESS = 0x48

# Create an instance of the I2C bus
bus = SMBus(1)

# Write a byte to the device
bus.write_byte(DEVICE_ADDRESS, 0x01)

# Read a byte from the device
data = bus.read_byte(DEVICE_ADDRESS)
print(f"Data read: {data}")

# Close the bus
bus.close()
In this example:
write_byte: Writes a byte to the device.read_byte: Reads a byte from the device.
Practical Examples
Reading an I2C Temperature Sensor
Let’s implement a practical example using an I2C temperature sensor, like the LM75. This sensor has a default I2C address of 0x48 and provides temperature readings in a 2-byte format.
from smbus2 import SMBus
import time

# LM75 sensor address
LM75_ADDRESS = 0x48

# Create an instance of the I2C bus
bus = SMBus(1)

try:
    while True:
        # Read 2 bytes of data from the sensor
        data = bus.read_i2c_block_data(LM75_ADDRESS, 0x00, 2)

        # Convert the data to temperature in degrees Celsius
        temperature = (data[0] << 8 | data[1]) >> 5
        temperature = temperature * 0.125

        print(f"Temperature: {temperature:.2f} °C")

        # Wait 1 second before the next reading
        time.sleep(1)

except KeyboardInterrupt:
    print("Reading stopped")

finally:
    # Close the I2C bus
    bus.close()
- Data reading: We use
read_i2c_block_datato read 2 bytes from the sensor. - Temperature conversion: The data is converted to temperature in degrees Celsius using the formula provided in the sensor’s datasheet.
- Infinite loop: The program reads the temperature every second until interrupted.
