What is a BME680?
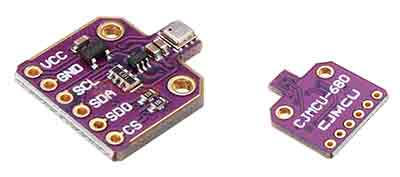
The BME680 is an indoor air quality sensor from Bosch that incorporates temperature, humidity, barometric pressure, and volatile organic compound (VOC) measurements that can be easily used with a processor like Arduino.
The sensor can detect gases such as carbon monoxide, ethanol, or acetone. It is also possible to calculate indoor air quality parameters, as well as estimate the equivalent carbon dioxide amount.
However, the BEM680 cannot distinguish between gases or perform individual measurements for each of them. Instead, it totals the total effect of the VOC to provide a quantitative idea of the resulting air quality.
The BME680 has an operating voltage of 1.2V to 3.6V. However, some modules incorporate a voltage regulator and a level converter, which allow them to operate directly at 5V.
Power consumption is 0.15 µA in sleep, 3.7 µA for humidity, pressure, and temperature measurements, and 0.09 to 12 mA for gas measurement, depending on the selected operating mode.
Communication is done via I²C up to 3.4 MHz, or 3- or 4-wire SPI up to 10 MHz. Therefore, it is very easy to connect it to a processor such as Arduino.
Price
We can find a BME680 sensor module for 8-10€, from international sellers on eBay and AliExpress.

How does a BME680 work?
The BME680 is composed of a MOX (Metal-oxide) sensor. In its operation, the MOX is heated and absorbs oxygen molecules. The component Datasheet provides the following values.
| Molar fraction | Compound | Production tolerance | Certified accuracy |
|---|---|---|---|
| 5 ppm | Ethane | 20% | 5% |
| 10 ppm | Isoprene /2-methyl-1,3 Butadiene | 20% | 5% |
| 10 ppm | Ethanol | 20% | 5% |
| 50 ppm | Acetone | 20% | 5% |
| 15 ppm | Carbon Monoxide | 10% | 2% |
By absorbing the VOC, the MOX varies its conductivity, so its resistance varies. With the value of this resistance, it is possible to calculate an air quality index.
| Resistance | Air quality |
|---|---|
| 0 – 50 | Good |
| 51 – 100 | Average |
| 101 – 150 | Little bad |
| 151 – 200 | Bad |
| 201 – 300 | Worse |
| 301 – 500 | Very bad |
The sensor provides a precision of 1.0 °C for temperature measurement, ± 3% for humidity, and ± 1 hPa for barometric pressure, equivalent to an altitude precision of ± 1 meter.
Like most chemical sensors, the BME680 needs a pre-heater. The manufacturer recommends that the sensor operate for 30 minutes for the measurements to stabilize, and for 48 hours if it is moved.
Assembly scheme
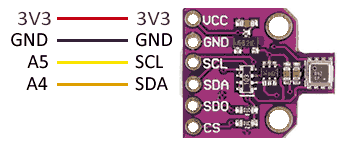
Module control is done via I2C, so the wiring is very simple. We simply power the module using GND and VDD, and connect the SDA and SCL I2C pins.

The connection seen from Arduino would be as follows.
Code examples
Adafruit Library
To control the BME680, we can use the library developed by Adafruit, whose code is available at https://github.com/adafruit/Adafruit_BME680.
The library includes examples of its use, which it is advisable to consult. The following is a summary extracted from them.
#include <Wire.h>
#include <SPI.h>
#include <Adafruit_Sensor.h>
#include "Adafruit_BME680.h"

const int BME_SCK = 13;
const int BME_MISO = 12;
const int BME_MOSI = 11;
const int BME_CS = 10;

const int SEALEVELPRESSURE_HPA = 1013.25;

Adafruit_BME680 bme;

void setup() {
    Serial.begin(9600);
    while (!Serial);
    Serial.println(F("BME680 test"));

    if (!bme.begin()) {
    Serial.println("Could not find a valid BME680 sensor, check wiring!");
    while (1);
    }

    // Set up oversampling and filter initialization
    bme.setTemperatureOversampling(BME680_OS_8X);
    bme.setHumidityOversampling(BME680_OS_2X);
    bme.setPressureOversampling(BME680_OS_4X);
    bme.setIIRFilterSize(BME680_FILTER_SIZE_3);
    bme.setGasHeater(320, 150); // 320*C for 150 ms
}

void loop() {
    if (! bme.performReading()) {
    Serial.println("Failed to perform reading :(");
    return;
    }
    Serial.print("Temperature = ");
    Serial.print(bme.temperature);
    Serial.println(" *C");

    Serial.print("Pressure = ");
    Serial.print(bme.pressure / 100.0);
    Serial.println(" hPa");

    Serial.print("Humidity = ");
    Serial.print(bme.humidity);
    Serial.println(" %");

    Serial.print("Gas = ");
    Serial.print(bme.gas_resistance / 1000.0);
    Serial.println(" KOhms");

    Serial.print("Approx. Altitude = ");
    Serial.print(bme.readAltitude(SEALEVELPRESSURE_HPA));
    Serial.println(" m");

    Serial.println();
    delay(2000);
}
Bosch Library
Another alternative is to use the library developed by Bosch, available at this link. This library is somewhat more complex than the Adafruit one, but it provides more sensor values such as the equivalent CO2 estimation.
However, the Bosch library takes up more memory. Therefore, it cannot be used on an Arduino Uno, Nano, or similar. It is compatible with Arduino Mega, ESP8266, ESP32, and other devices. Consult the documentation for a complete list of compatible devices.
The library includes examples of its use, which it is advisable to consult. The following is a summary extracted from them.
    #include "bsec.h"

    // Helper functions declarations
    void checkIaqSensorStatus(void);
    void errLeds(void);

    // Create an object of the class Bsec
    Bsec iaqSensor;

    String output;

    // Entry point for the example
    void setup(void)
    {
      Serial.begin(115200);
      Wire.begin();

      iaqSensor.begin(BME680_I2C_ADDR_PRIMARY, Wire);
      output = "\nBSEC library version " + String(iaqSensor.version.major) + "." + String(iaqSensor.version.minor) + "." + String(iaqSensor.version.major_bugfix) + "." + String(iaqSensor.version.minor_bugfix);
      Serial.println(output);
      checkIaqSensorStatus();

      bsec_virtual_sensor_t sensorList[10] = {
        BSEC_OUTPUT_RAW_TEMPERATURE,
        BSEC_OUTPUT_RAW_PRESSURE,
        BSEC_OUTPUT_RAW_HUMIDITY,
        BSEC_OUTPUT_RAW_GAS,
        BSEC_OUTPUT_IAQ,
        BSEC_OUTPUT_STATIC_IAQ,
        BSEC_OUTPUT_CO2_EQUIVALENT,
        BSEC_OUTPUT_BREATH_VOC_EQUIVALENT,
        BSEC_OUTPUT_SENSOR_HEAT_COMPENSATED_TEMPERATURE,
        BSEC_OUTPUT_SENSOR_HEAT_COMPENSATED_HUMIDITY,
      };

      iaqSensor.updateSubscription(sensorList, 10, BSEC_SAMPLE_RATE_LP);
      checkIaqSensorStatus();

      // Print the header
      output = "Timestamp [ms], raw temperature [°C], pressure [hPa], raw relative humidity [%], gas [Ohm], IAQ, IAQ accuracy, temperature [°C], relative humidity [%], Static IAQ, CO2 equivalent, breath VOC equivalent";
      Serial.println(output);
    }

    // Function that is looped forever
    void loop(void)
    {
      unsigned long time_trigger = millis();
      if (iaqSensor.run()) { // If new data is available
        output = String(time_trigger);
        output += ", " + String(iaqSensor.rawTemperature);
        output += ", " + String(iaqSensor.pressure);
        output += ", " + String(iaqSensor.rawHumidity);
        output += ", " + String(iaqSensor.gasResistance);
        output += ", " + String(iaqSensor.iaq);
        output += ", " + String(iaqSensor.iaqAccuracy);
        output += ", " + String(iaqSensor.temperature);
        output += ", " + String(iaqSensor.humidity);
        output += ", " + String(iaqSensor.staticIaq);
        output += ", " + String(iaqSensor.co2Equivalent);
        output += ", " + String(iaqSensor.breathVocEquivalent);
        Serial.println(output);
      } else {
        checkIaqSensorStatus();
      }
    }

    // Helper function definitions
    void checkIaqSensorStatus(void)
    {
      if (iaqSensor.status != BSEC_OK) {
        if (iaqSensor.status < BSEC_OK) {
          output = "BSEC error code : " + String(iaqSensor.status);
          Serial.println(output);
          for (;;)
            errLeds(); /* Halt in case of failure */
        } else {
          output = "BSEC warning code : " + String(iaqSensor.status);
          Serial.println(output);
        }
      }

      if (iaqSensor.bme680Status != BME680_OK) {
        if (iaqSensor.bme680Status < BME680_OK) {
          output = "BME680 error code : " + String(iaqSensor.bme680Status);
          Serial.println(output);
          for (;;)
            errLeds(); /* Halt in case of failure */
        } else {
          output = "BME680 warning code : " + String(iaqSensor.bme680Status);
          Serial.println(output);
        }
      }
    }

    void errLeds(void)
    {
      pinMode(LED_BUILTIN, OUTPUT);
      digitalWrite(LED_BUILTIN, HIGH);
      delay(100);
      digitalWrite(LED_BUILTIN, LOW);
      delay(100);
    }
Download the code
All the code from this post is available for download on Github.


