NuGet is the package manager created by Microsoft for managing libraries in .NET projects. With NuGet, we can easily and quickly download libraries.
Packages: A NuGet package is a distribution unit that contains code, resources, and metadata that describe how to use it. Packages are usually in
.nupkgformat.Repositories: NuGet uses repositories to store and distribute packages. The most common repository is nuget.org, but local and private repositories can also be used.
NuGet takes care of managing the dependencies between different libraries, ensuring that all versions are compatible and avoiding conflicts among them.
In addition to third-party libraries, NuGet also allows the distribution of custom packages, which facilitates code reuse (for example, within an organization or development team).
If you want to learn about what package managers are
check out the Introduction to Programming Course read more
How to search for and install NuGet packages
NuGet packages can be installed in your project in several ways, including using the command line, the Package Manager in Visual Studio, via command prompt, or by directly editing the .csproj project file.
Using the Visual Studio Interface
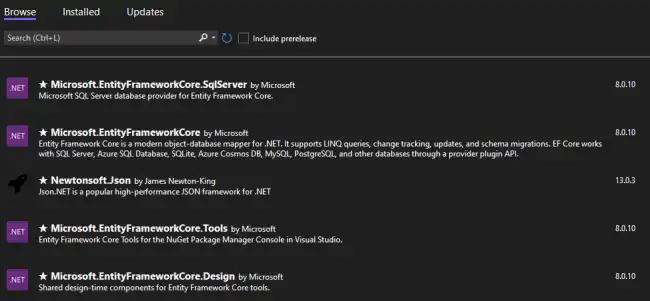
The most common way to install NuGet packages is through Visual Studio, where you can search for and download packages from the NuGet gallery.
To do this, simply right-click on the project in the Solution Explorer, and choose Manage NuGet Packages.

The package manager will pop up, where you can see the installed packages in the solution. You can also update packages from here.
You can also search for packages to install by typing the name of the package you need or related keywords.

To install a package, you simply need to click on Install. Visual Studio will automatically add the package to your project and configure the dependencies in the .csproj file.
Using the Command Line
You can also manage NuGet packages from the command prompt using the .NET CLI (for example, if you are not using Visual Studio).
To install a package using the .NET CLI, you would run,
dotnet add package <package name> --version <new version>If you omit --version <new version>, the latest stable version available will be installed
Other basic NuGet commands in the CLI are:
dotnet remove package <package-name>: Removes the specified package.dotnet restore: Restores all dependencies for your project, downloading the indicated package versions.dotnet list package: Displays a list of the packages installed in your project.
To update a package, you also use add, just as if you were installing it from scratch.
Setting Up and Using NuGet Packages in a Project
Once a package is installed, its functions are already available for use in your code. There is nothing else to do.
However, in general, external packages will have their functions in a Namespace, which we will need to reference in our code.
For example, let’s take the popular library Newtonsoft.Json,
// importing the namespace
using Newtonsoft.Json;

Persona persona = new Persona { Nombre = "Carlos", Edad = 25 };
string json = JsonConvert.SerializeObject(persona);
Console.WriteLine(json);
In this example, JsonConvert is a class that is part of Newtonsoft.Json and allows you to convert an object into a JSON string.
Creating a Custom NuGet Package
If you develop a library, you can also package it as a NuGet package. This is particularly useful in collaborative environments.
To do this, first, make sure everything compiles correctly (otherwise, it won’t let you create it) and that all functionality is well documented.
Now, in the terminal, navigate to the project directory and run:
dotnet packThis command will create a .nupkg file, which contains everything needed to distribute your library.
Alternatively, in Visual Studio, there is a “tick” in Project Settings / Package that allows you to automatically generate the NuGet package on each build.

Sharing a Custom NuGet Package
If you want to share your custom package, you can do so in several ways:
- You can share it publicly by uploading it to a repository like nuget.org.
- You can share it privately by uploading it to a private repository (most likely, it will be paid)
- You can create your own private repository. There are several ways to do this, but the simplest is to simply create a network folder and put the NuGet packages inside.