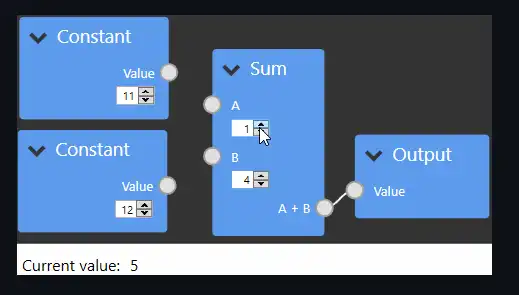
NodeNetwork is an open-source library for C# that facilitates the creation of node editors in WPF (Windows Presentation Foundation) applications.
Based on ReactiveUI, NodeNetwork provides a robust and flexible solution for designing interactive and reactive user interfaces that require visual manipulation of nodes and connections.

Features of NodeNetwork,
- Node Editor: Allows creating visual interfaces where users can add, connect, and manipulate nodes.
- Based on ReactiveUI: Uses ReactiveUI to provide a reactive and smooth user experience.
- Flexible and Extensible: Offers a modular structure that makes it easy to customize and extend components.
- Advanced Interactivity: Supports operations such as dragging and dropping nodes, connecting nodes through links, and updating the interface in real time.
For more details, documentation, and additional examples, visit the NodeNetwork repository on GitHub and explore how this library can enhance interaction in your WPF applications.
Installing NodeNetwork
To start using NodeNetwork in your WPF project, you first need to add the corresponding package via NuGet. You can do this through the Package Manager Console in Visual Studio or using the .NET CLI. Here’s the command to install NodeNetwork:
Install-Package NodeNetworkUsing NodeNetwork
To use NodeNetwork in a WPF application, you need to set up the working environment and add the necessary controls. Here is an example of a basic setup in XAML and C#:
Setup in XAML
In your XAML file, add a NodeNetworkView control that will serve as the main area for the node editor:
<Window x:Class="NodeNetworkExample.MainWindow"
        xmlns="http://schemas.microsoft.com/winfx/2006/xaml/presentation"
        xmlns:x="http://schemas.microsoft.com/winfx/2006/xaml"
        xmlns:nodenetwork="clr-namespace:NodeNetwork.Controls;assembly=NodeNetwork"
        Title="NodeNetwork Example" Height="450" Width="800">
    <Grid>
        <nodenetwork:NodeNetworkView Name="nodeNetworkView" />
    </Grid>
</Window>
Setup in C#
In the code-behind file, you can initialize and configure the NodeNetworkView. Here’s an example of how to do it:
using System.Windows;
using NodeNetwork.Controls;
using NodeNetwork.ViewModels;
using NodeNetwork.Models;

namespace NodeNetworkExample
{
    public partial class MainWindow : Window
    {
        public MainWindow()
        {
            InitializeComponent();
            InitializeNodeNetwork();
        }

        private void InitializeNodeNetwork()
        {
            // Create a new node network model
            var nodeNetwork = new NodeNetworkViewModel();

            // Configure the NodeNetworkView to use the model
            nodeNetworkView.DataContext = nodeNetwork;

            // Create and add nodes
            var node1 = new NodeViewModel("Node 1");
            var node2 = new NodeViewModel("Node 2");

            nodeNetwork.Nodes.Add(node1);
            nodeNetwork.Nodes.Add(node2);

            // Connect nodes
            nodeNetwork.Connections.Add(new ConnectionViewModel(node1, node2));
        }
    }
}
Creating Nodes and Connections
NodeNetwork allows you to create nodes and connections between them programmatically. Here’s an example of how to create nodes and establish connections:
using NodeNetwork.ViewModels;
using NodeNetwork.Models;

private void CreateNodesAndConnections()
{
    // Create nodes
    var nodeA = new NodeViewModel("Node A");
    var nodeB = new NodeViewModel("Node B");

    // Add nodes to the network
    nodeNetwork.Nodes.Add(nodeA);
    nodeNetwork.Nodes.Add(nodeB);

    // Create a connection between nodes
    var connection = new ConnectionViewModel(nodeA, nodeB);
    nodeNetwork.Connections.Add(connection);
}
Customizing the Interface
NodeNetwork provides options to customize the appearance and behavior of nodes and connections. You can create your own styles and templates for the nodes and connections in XAML.
Here’s an example of how to customize the appearance of nodes in XAML:
<Style TargetType="{x:Type nodenetwork:NodeControl}">
    <Setter Property="Template">
        <Setter.Value>
            <ControlTemplate TargetType="{x:Type nodenetwork:NodeControl}">
                <Border Background="LightBlue" BorderBrush="Black" BorderThickness="1">
                    <TextBlock Text="{Binding Title}" Padding="5" />
                </Border>
            </ControlTemplate>
        </Setter.Value>
    </Setter>
</Style>
You can also customize the appearance of the connections:
<Style TargetType="{x:Type nodenetwork:ConnectionControl}">
    <Setter Property="Template">
        <Setter.Value>
            <ControlTemplate TargetType="{x:Type nodenetwork:ConnectionControl}">
                <Line Stroke="Black" StrokeThickness="2" />
            </ControlTemplate>
        </Setter.Value>
    </Setter>
</Style>