
We continue with the posts aimed at getting to know our FFF 3D printer within our 3D printing design section.
We have already seen how a 3D printer works, how its kinematics work, and learned to identify the main parts of a printer.
Now it’s time to delve into the details of the elements that typically make up domestic 3D printers, looking at the main components we will find in printers and their functionality.
Knowing these components will allow us to understand how our machine works, dare to make improvements or repairs, and even venture into designing our own 3D printers!
So let’s look at each of these components that make up (or can make up) our printer, organized by category and function.
Structure
We start with the most basic and perhaps most obvious. We have the elements that make up the structure. Here we will find folded sheets, structural profiles, brackets, angle brackets.
We can find both metal and plastic/acrylic elements. In principle, we will always prefer metal elements for being more robust.

Special mention goes to generic structural profiles, very useful especially if we are designing our own CNC machine.
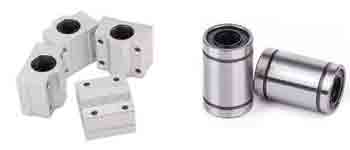
Guidance
Now that we have solved the movement with motors, pulleys, and threaded rods, we need to register or guide the elements, so that the positioning is smooth and precise.
A common option is to use smooth rods, over which the element we want to move will slide.

To allow movement, we will find bushings, into which the rod is inserted, while the body is attached to the element we want to guide.
Another option is to use rails and profiles. Their operation is similar to rods.

Finally, although less frequent, we can also find bearings, as elements that facilitate rotation. For example, we can find them to hold one end of a threaded rod.

Movement
As we said, our 3D printer needs to move. It is normal to use Nema 17 type stepper motors, which are already old acquaintances of our blog.
We will need at least 4 motors, 3 for the movement of the 3 axes, and a fourth to feed the filament. Although they can have more, if any axis has a dual motor.

We will also find couplings, which serve to connect the motors with other elements. We can find fixed or flexible couplings.

On the other hand, our machine has to have linear displacements, while the motors produce rotational movements. Therefore, we need mechanisms to convert rotation into linear motion. There are two typical solutions.
The first one is the threaded rod, a rod with a helical groove (like a screw) and, when turning, it converts the motion into linear.

The other common solution is pulleys. The pulley is attached to the motor and, when rotating, the pulley converts the rotational motion into linear motion.

Thermal Elements
Here we will group the elements that, in some way, are involved in the process of melting and depositing the filament.
So we start with the heated bed. As we have mentioned several times, it is the element on which the printing will be done. The bed is heated to improve the adhesion of the part; without it, it would be very difficult for the part to stick.

On the other hand, we have the print head or hotend, which is the element responsible for melting and depositing the filament.

The hotend contains a heating cartridge that is responsible for raising the temperature to reach the melting point of the filament.

And a thermal sensor that is responsible for controlling the printing temperature.

On the other hand, we will have fans to cool both the hotend and the deposited filament. We will find both axial fans and blower fans, the former being used to cool the machine itself (the hotend) and the blower fans to cool the material.

Finally, although it is not a thermal element (but otherwise I didn’t know where to put it, it fits better here) we have Bowden tubes and couplings, which are plastic tubes that guide the material inside the machine, usually between the extruder and the hotend.

Electronics
As we saw in the previous post, in addition to the thermal and mechanical components, our printer has a series of electronic elements that control the entire process.
The first part and, surely the bulkiest, is the power supply, which converts the mains voltage to the voltages used by the printer’s electronics.

On the other hand, we will have a control board, which is the “brain” of our printer. There are many types of control boards, and it would deserve its own post. But, in summary, its function is to control all the elements of the printer (motors, heating cartridge, thermal sensor, display, etc.)

If you’re curious, the Ramps is a very famous model and, in a way, many current boards are its descendants.
We will also have, usually mounted on the control board itself, the motor drivers. These are responsible for precisely controlling the movement of the stepper motors and are also old acquaintances of the blog.

So, in summary, these are the main types of components we are going to find in our 3D printer.
Conclusion
We have already seen the basic aspects and components of a 3D printer and their functionality. In the meantime, it has been hinted that the extruder can be on the structure or on the print head. We will see this in the next post where we will look at Bowden and direct drive type printers, and their advantages and disadvantages. See you next time!
